Whether you need to better organize your hard drive or resolve disk errors, Disk Utility is the tool for the job. Built into macOS, Disk Utility allows you to view details on your hard drive, add or remove partitions and volumes, and check the disk for glitches. Here’s how it works.
To access Disk Utility while logged in, go to the Finder and click the Go menu, select Utilities, and then in the window that appears, double-click the Disk Utility icon. The tool displays details and a graph of your hard drive configuration, showing the overall capacity as well as the used and free space and the various volumes.
Mac mini (M1, 2020)
 https://b2c-contenthub.com/wp-content/uploads/2021/04/m1-mac-mini-display.jpg?resize=300%2C200&quality=50&strip=all 300w, https://b2c-contenthub.com/wp-content/uploads/2021/04/m1-mac-mini-display.jpg?resize=768%2C512&quality=50&strip=all 768w, https://b2c-contenthub.com/wp-content/uploads/2021/04/m1-mac-mini-display.jpg?resize=1200%2C800&quality=50&strip=all 1200w, https://b2c-contenthub.com/wp-content/uploads/2021/04/m1-mac-mini-display.jpg?resize=1240%2C826&quality=50&strip=all 1240w, https://b2c-contenthub.com/wp-content/uploads/2021/04/m1-mac-mini-display.jpg?resize=150%2C100&quality=50&strip=all 150w" sizes="(max-width: 1024px) 100vw, 1024px" />
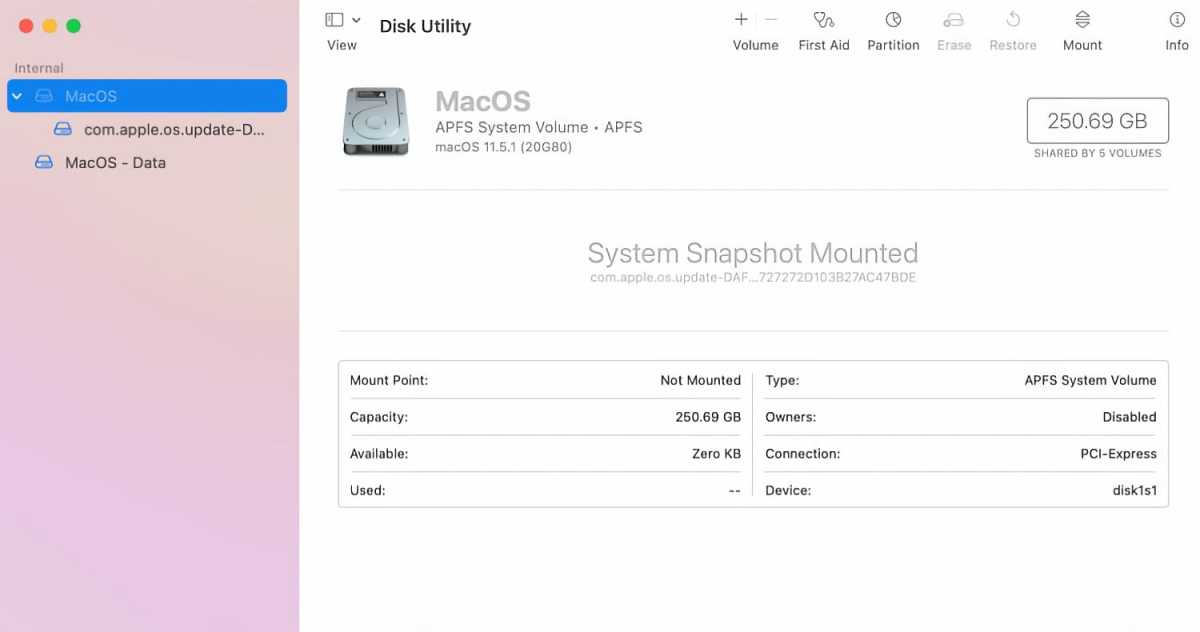
To dig up more information on your drive, click the Info icon at the top. The window that pops up displays a host of details, including the OS name and version, file system, drive connection type, encryption status, and much more.
Before we go further, a quick primer on the Mac’s file system. With macOS 10.13 High Sierra, Apple replaced the old HFS+ format with APFS (Apple File System). AFPS offers certain benefits, including faster performance, greater reliability, and space sharing. With space sharing, a single APFS container or partition can dynamically allocate space as needed to different volumes.
 https://www.macworld.com/wp-content/uploads/2021/08/macos-big-sur-disk-utility.jpg?resize=300%2C158&quality=50&strip=all 300w, https://www.macworld.com/wp-content/uploads/2021/08/macos-big-sur-disk-utility.jpg?resize=768%2C404&quality=50&strip=all 768w, https://www.macworld.com/wp-content/uploads/2021/08/macos-big-sur-disk-utility.jpg?resize=1200%2C632&quality=50&strip=all 1200w" sizes="(max-width: 1500px) 100vw, 1500px" />
The Disk Ulity main user interface.
IDG
Now let’s say you want to organize your physical drive into different sections, maybe one for your operating system, a second one for your personal files, and a third for your work-related files. You can certainly set up multiple partitions. (A partition is a specific segment of space on your Mac’s storage device.) But if you opt to use volumes instead, your free space is allocated among them on the fly.
To create a new volume, select any existing volume on the left and click the + sign for the Volume icon at the top. Change the name from Untitled to something specific and click Add. When the process is finished, click Done.
Next, you may want to change the name of an existing volume. To do this, right-click on the volume, select Rename and type the new name. In the Finder, if you click the Go menu and select Computer, you should see the new and renamed volumes you created.
If you no longer need or use a volume you created, right-click on it and select Delete APFS Volume.
If you wish to keep a volume you created but want to remove the data stored on it, right-click on it and select Erase. Then click the Erase button to confirm.
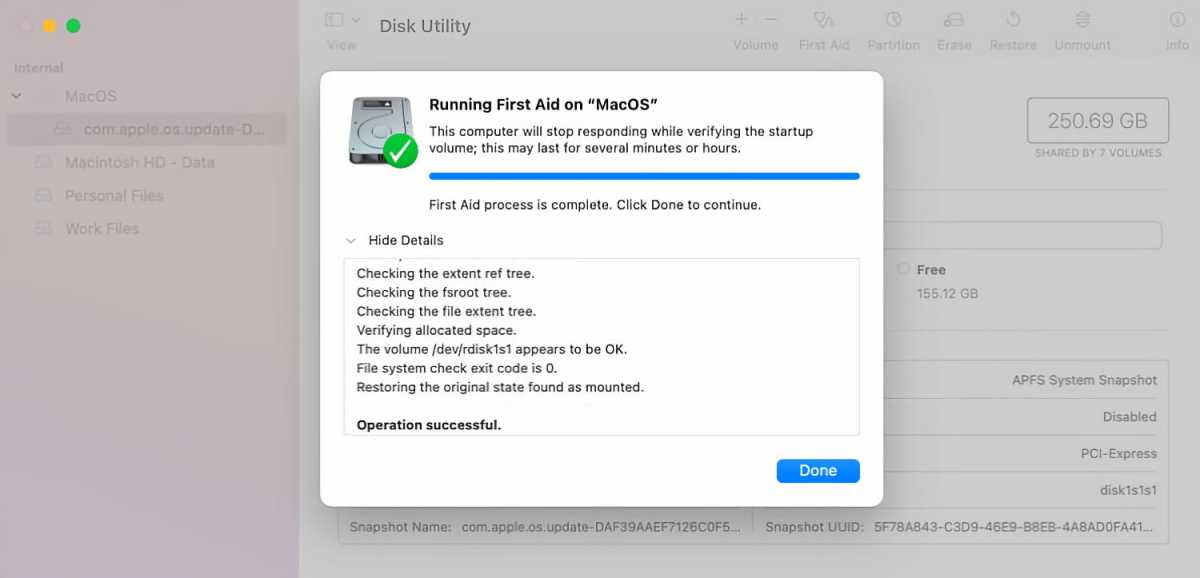
Finally, maybe you’re bumping into errors or problems with your hard drive. Select any volume on the drive and click the First Aid icon at the top. Click Run. A scan kicks off and tries to resolve any disk errors that it finds. When the process is done, click the entry to Show Details to see the results.
 https://www.macworld.com/wp-content/uploads/2021/08/macos-big-sur-disk-utility-first-aid.jpg?resize=300%2C145&quality=50&strip=all 300w, https://www.macworld.com/wp-content/uploads/2021/08/macos-big-sur-disk-utility-first-aid.jpg?resize=768%2C370&quality=50&strip=all 768w, https://www.macworld.com/wp-content/uploads/2021/08/macos-big-sur-disk-utility-first-aid.jpg?resize=1200%2C578&quality=50&strip=all 1200w" sizes="(max-width: 1500px) 100vw, 1500px" />
Fixing drive errors in Disk Utility.
IDG


