Mac 911 receives email regularly from people severing relationships—and not realizing how their digital lives remain entwined. An iCloud account can be the hub of your online life, and if you chose to share an account with a partner (even for limited purposes), they may still continue to have access to personal information and media when they are no longer a part of your life. Based on the email we get, you might like to disable that access.
Fortunately, Apple makes it quite easy to sever remote links to your set of iCloud information because each device that accesses iCloud data must be logged into an iCloud account. Once removed, it can no longer access new data or archived information related to that iCloud (like new photos or messages), but may retain local copies of everything downloaded.
Here’s how to proceed.
Remove devices from your Apple ID account
First, remove the unwanted devices from your account. (This is good security hygiene, ex-partner aside.) Apple offers a lot of options. Start in any of the following locations:
- iOS/iPadOS: Go to Settings > Account Name and scroll to the bottom.
- macOS 10.15 Catalina or later: Open the Apple ID system preference and look in the left-hand devices list.
- macOS 10.14 Mojave or earlier: Open the iCloud system preference, click Account Details, and click Devices.
- Apple ID website: Log in to appleid.apple.com and look under Devices.
- In the Find My app in iOS, iPadOS, or macOS: In the Devices view, select a device; in macOS, you have to also tap the i info button.
In any of the methods above, click or tap Remove This Device. You’re prompted to confirm and the device is removed. This severs any sync operations with that device.
Change password and remove trusted phone numbers
 https://b2c-contenthub.com/wp-content/uploads/2021/09/mac911-trusted-numbers.png?resize=300%2C179&quality=50&strip=all 300w, https://b2c-contenthub.com/wp-content/uploads/2021/09/mac911-trusted-numbers.png?resize=768%2C459&quality=50&strip=all 768w" height="536" sizes="(max-width: 896px) 100vw, 896px" />
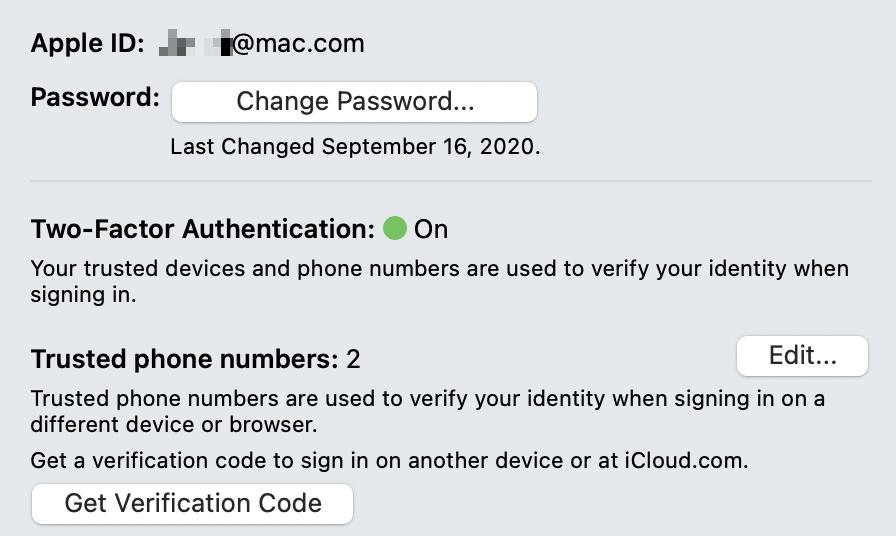
Next, you need to make sure this other person can’t log back into your iCloud account. (This doesn’t necessarily impugn that person: they may not realize that you still use the account, that they’re synced to it, etc.)
Since most Apple IDs have two-factor authentication enabled, that requires two changes:
- Change your Apple ID password for the account you use with iCloud.
- Disable any trusted phone numbers that remain in the account which can be used to receive a numeric code to confirm a login. (Removing the device above disables its use as a trusted device that similarly receives such codes, but doesn’t affect trusted phone numbers.)
To perform both those tasks, go to any of the following locations:
- iOS/iPadOS: Go to Settings > Account Name > Password & Security.
- macOS 10.15 Catalina or later: Open the Apple ID system preference and select Password & Security.
- macOS 10.14 Mojave or earlier: Open the iCloud system preference, click Account Details, and click Security.
- Apple ID website: Log in to appleid.apple.com and scroll to the Security section.
To change your password, click or tap Change Password and follow the prompts. You may be prompted on all your other devices to enter the new password or confirm the login with a trusted device or phone number.
To remove a trusted phone number from the locations above, click or tap Edit next to Trusted Numbers if there’s an Edit button. Then either click or tap the remove X icon to the number’s right or select the number and click the remove – (minus) icon below the list. Click or tap Done to exit.
Final clean-up stages
A couple of steps remain for extra assurance. At the Apple ID site, make sure the address set for Notification Email in the Security section belongs to you. If not, change it.
On an iPhone, ensure that no accidental message or other forwarding continues to be in place:
- In Settings > Messages > Text Message Forwarding, disable any unwanted device.
- In Settings > Phone > Calls on Other Devices, do the same.
Starting with iOS 15/iPadOS 15, you can also add a person for iCloud Data Recovery Service. (That’s found in Settings > Account Name > Password & Security > Account Recovery.) If you’ve signed up for it, make sure to change your setting if you set a partner as your recovery contact and you no longer want them to perform that role for you.
This Mac 911 article is in response to a question submitted by an anonymous Macworld reader.
Ask Mac 911
We’ve compiled a list of the questions we get asked most frequently, along with answers and links to columns: read our super FAQ to see if your question is covered. If not, we’re always looking for new problems to solve! Email yours to mac911@macworld.com, including screen captures as appropriate and whether you want your full name used. Not every question will be answered, we don’t reply to email, and we cannot provide direct troubleshooting advice.


