Apple’s Rapid Security Responses can help push out software fixes more quickly than the traditional operating system (OS) update process. But they can occasionally cause entirely new problems, and you may wish to undo the damage by removing the update. In this article, we explain how to remove an Apple Rapid Security Response update that may be causing problems.
What’s a Rapid Security Response?
In May 2023, Apple rolled out the first of a new kind of software update: the Rapid Security Response. Designated by parenthetical letters rather than version numbers, these are designed as small, targeted patches to fix urgent iPhone, iPad, and Mac vulnerabilities without having to wait for a larger OS update.
“[Rapid Security Responses] deliver important security improvements between software updates,” Apple explains. “They may also be used to mitigate some security issues more quickly, such as issues that might have been exploited or reported to exist ‘in the wild’.”
Why would you want to remove a Rapid Security Response?
The concept outlined above is a good idea in principle, and generally speaking, you shouldn’t remove them. They are designed to fix urgent problems and are beneficial… most of the time.
However, the system has experienced some teething troubles. This may be related to the speed and urgency that are so fundamental to the way it works: full OS updates go through multiple rounds of beta testing before being rolled out, whereas Rapid Security Responses are designed to bypass this long-winded process. In theory that shouldn’t be a problem, because they are so much more limited in their scope than a full OS update, but bugs can slip through.
In July, Apple used Rapid Security Response to push out “(a)” updates for iOS 16.5.1, iPadOS 16.5.1, and macOS 13.4.1, but these were quickly found to cause a new problem, and one that was arguably bigger than the one they were designed to fix. (How bad was it? That depends on who you ask. Apple said the updates “might prevent some websites from displaying properly.” Users complained that they “broke certain apps such as Facebook, Instagram, and Zoom to name a few.”) Apple pulled the updates and advised users who had already installed them to remove them from their devices.
In these specific situations, where a Rapid Security Response has caused a documented problem and Apple has acknowledged that this is the case, removing it is the right decision.
If you’re worried, by the way, that removing the Rapid Security Response will leave you vulnerable to the urgent problem it was intended to fix… well, that is true. But Apple will roll out a new fix to replace it as soon as it can, and this procedure is for those moments when the cure is worse than the disease.
I thought it was impossible to go back to an earlier software version.
For full OS updates, this is often true. You can’t downgrade your iPhone to a version of iOS that Apple no longer offers for download, for example, and going back to previous editions of macOS is a challenge too. But Rapid Security Responses are different in this respect too, and Apple offers an easy way to remove them from your iPhone.
How do I remove a Rapid Security Response from my iPhone?
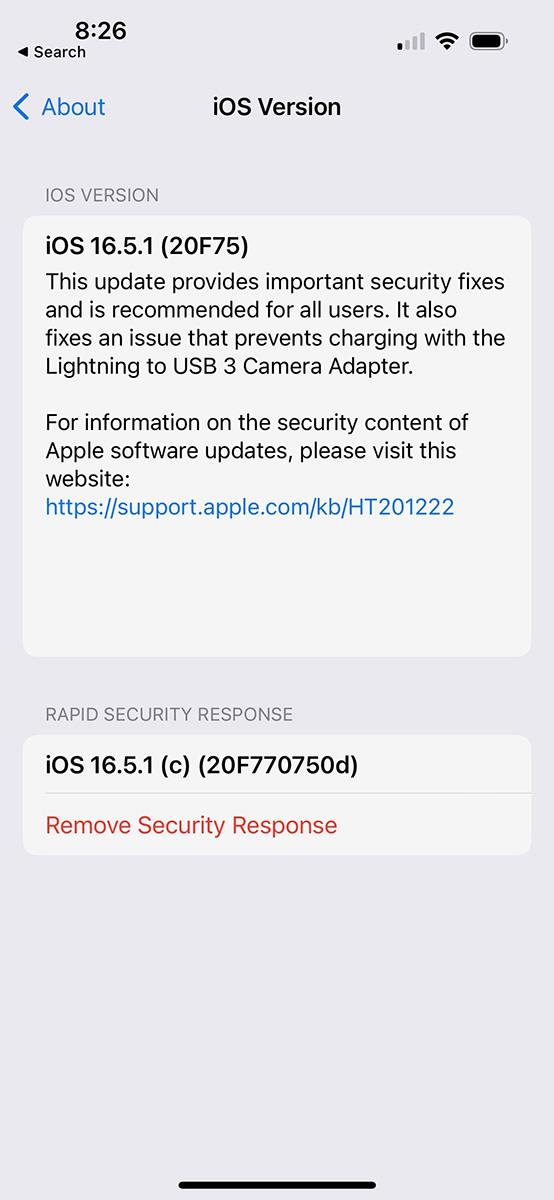
It’s simple. Open the Settings app and go to General > About > iOS Version. Assuming you’ve installed a Rapid Security Response, you’ll see it at the bottom of the screen. Tap Remove Security Response, then hit Remove to confirm.
 https://b2c-contenthub.com/wp-content/uploads/2023/08/Remove-Rapid-Security-Response-iPhone.jpg?resize=139%2C300&quality=50&strip=all 139w" sizes="(max-width: 554px) 100vw, 554px" />
Foundry
If you don’t see a Rapid Security Response on this screen, that means you haven’t installed one, so you don’t need to worry about any reports you’ve read of them causing a bug.
How do I remove a Rapid Security Response from my iPad?
Pretty much the same as on the iPhone. Settings > General > About > iPadOS Version, look for a Rapid Security Response at the bottom of the screen, then tap ‘Remove Security Response,’ and Remove to confirm.
How do I remove a Rapid Security Response from my Mac?
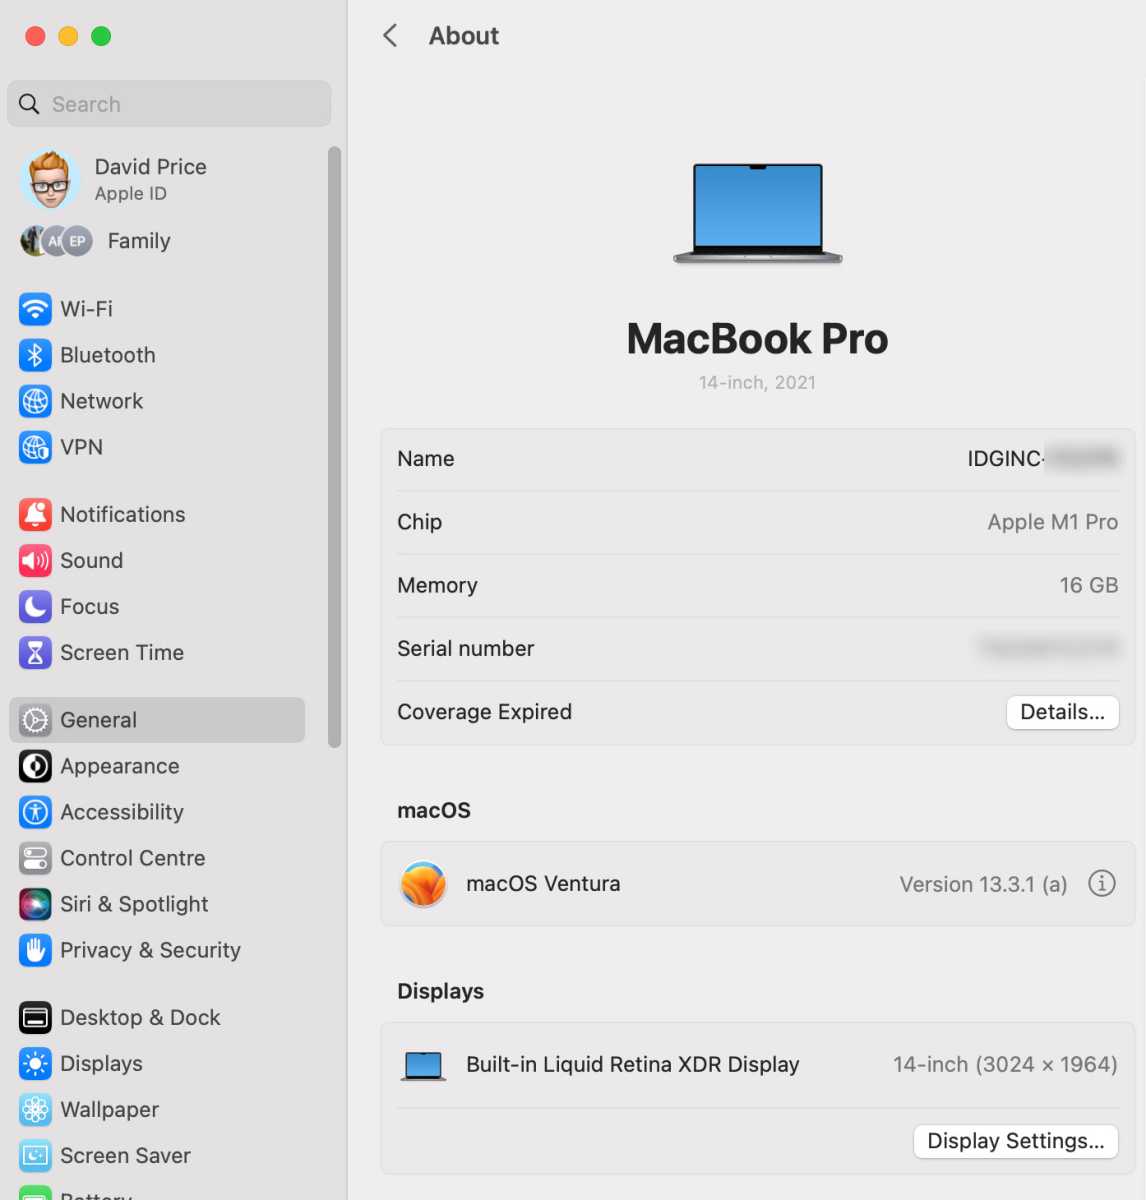
Click the Apple menu in the top-left corner, then select About this Mac. Click More Info to see the “About” page in System Settings. (Alternatively, you can reach this page by opening the System Settings app and going to General > About.)
 https://b2c-contenthub.com/wp-content/uploads/2023/08/How-remove-Rapid-Security-Response-Mac.jpg?resize=286%2C300&quality=50&strip=all 286w, https://b2c-contenthub.com/wp-content/uploads/2023/08/How-remove-Rapid-Security-Response-Mac.jpg?resize=768%2C804&quality=50&strip=all 768w, https://b2c-contenthub.com/wp-content/uploads/2023/08/How-remove-Rapid-Security-Response-Mac.jpg?resize=1146%2C1200&quality=50&strip=all 1146w" width="1146" height="1200" sizes="(max-width: 1146px) 100vw, 1146px" />
Foundry
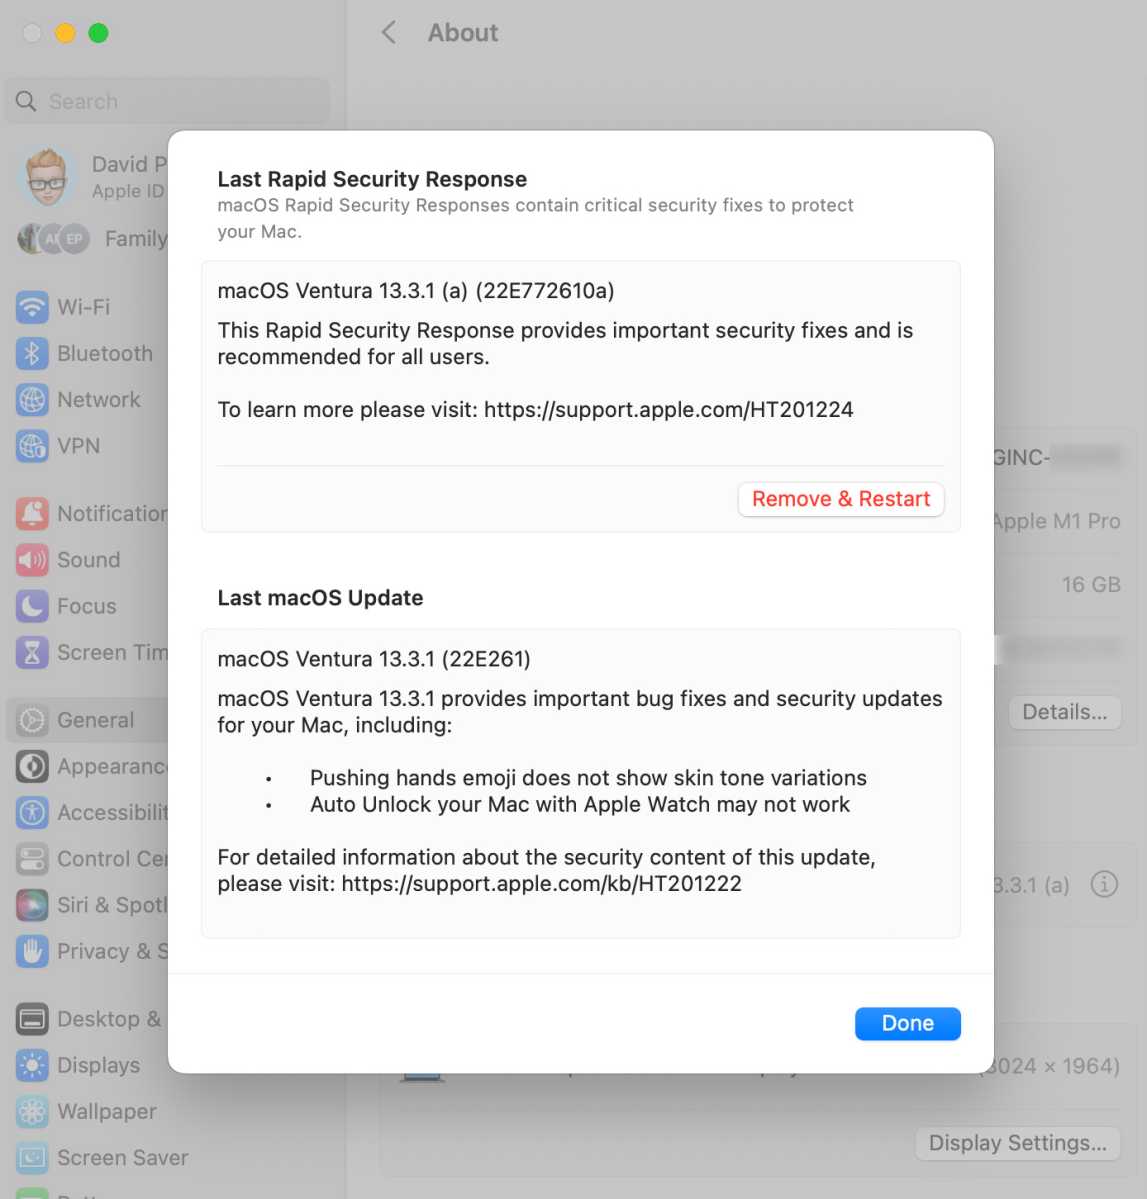
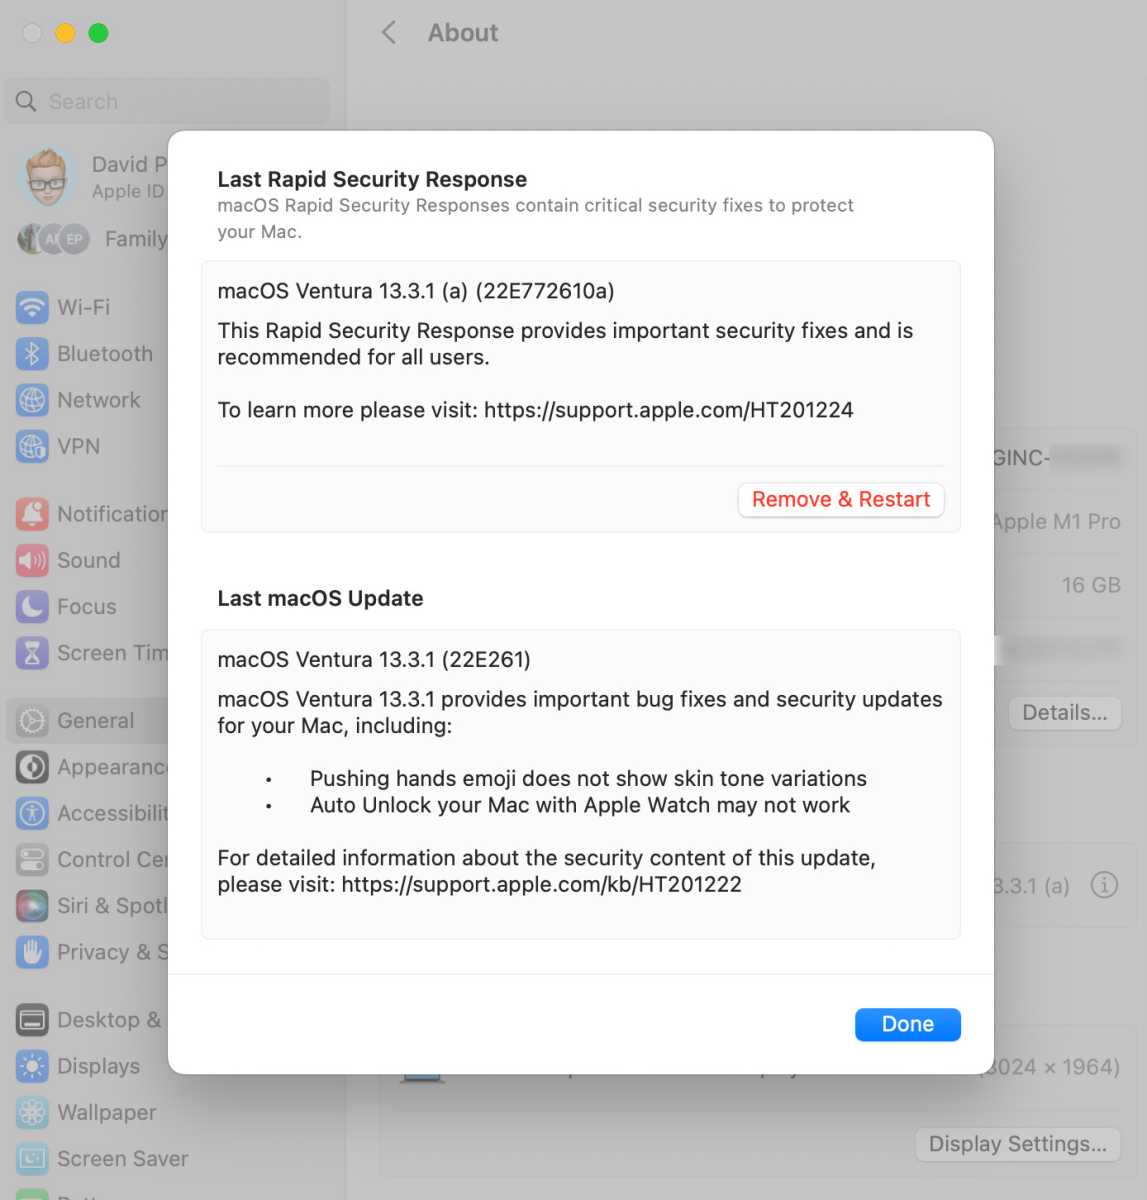
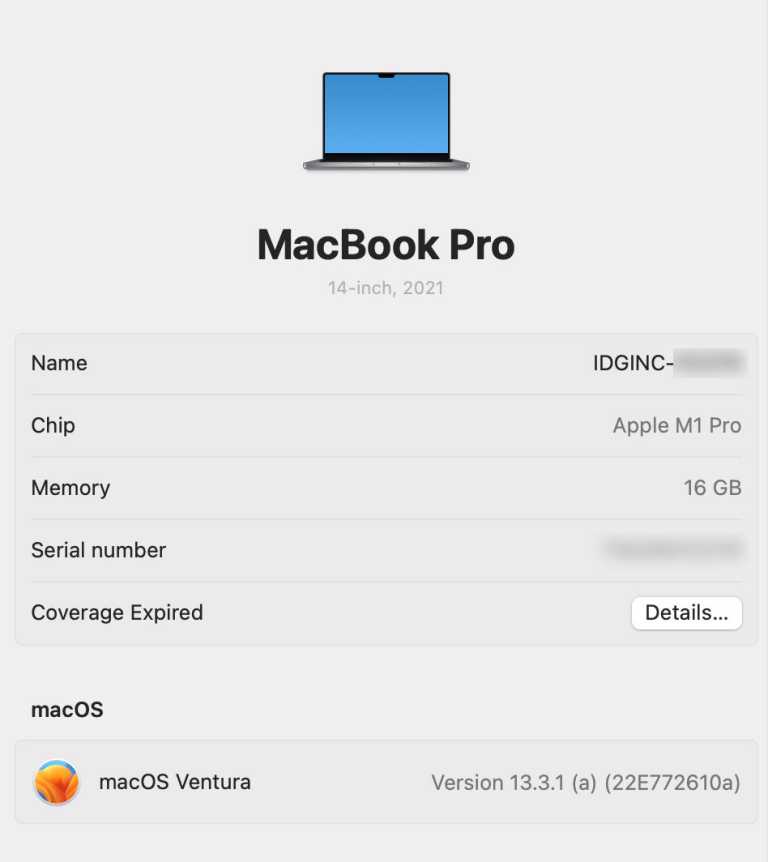
In this tab you’ll see a few essential details about your Mac—processor, memory, etc.—and you’ll see an entry showing the version of macOS that you’re running, with a lowercase letter “i” button. Click this button, and you’ll see the last Rapid Security Response you’ve installed (if any) and the latest version of macOS. The former should have a Remove & Restart button. Click this, then Confirm.
 https://b2c-contenthub.com/wp-content/uploads/2023/08/How-remove-Rapid-Security-Response-Mac-2.jpg?resize=287%2C300&quality=50&strip=all 287w, https://b2c-contenthub.com/wp-content/uploads/2023/08/How-remove-Rapid-Security-Response-Mac-2.jpg?resize=768%2C803&quality=50&strip=all 768w, https://b2c-contenthub.com/wp-content/uploads/2023/08/How-remove-Rapid-Security-Response-Mac-2.jpg?resize=1147%2C1200&quality=50&strip=all 1147w" width="1147" height="1200" sizes="(max-width: 1147px) 100vw, 1147px" />
Foundry
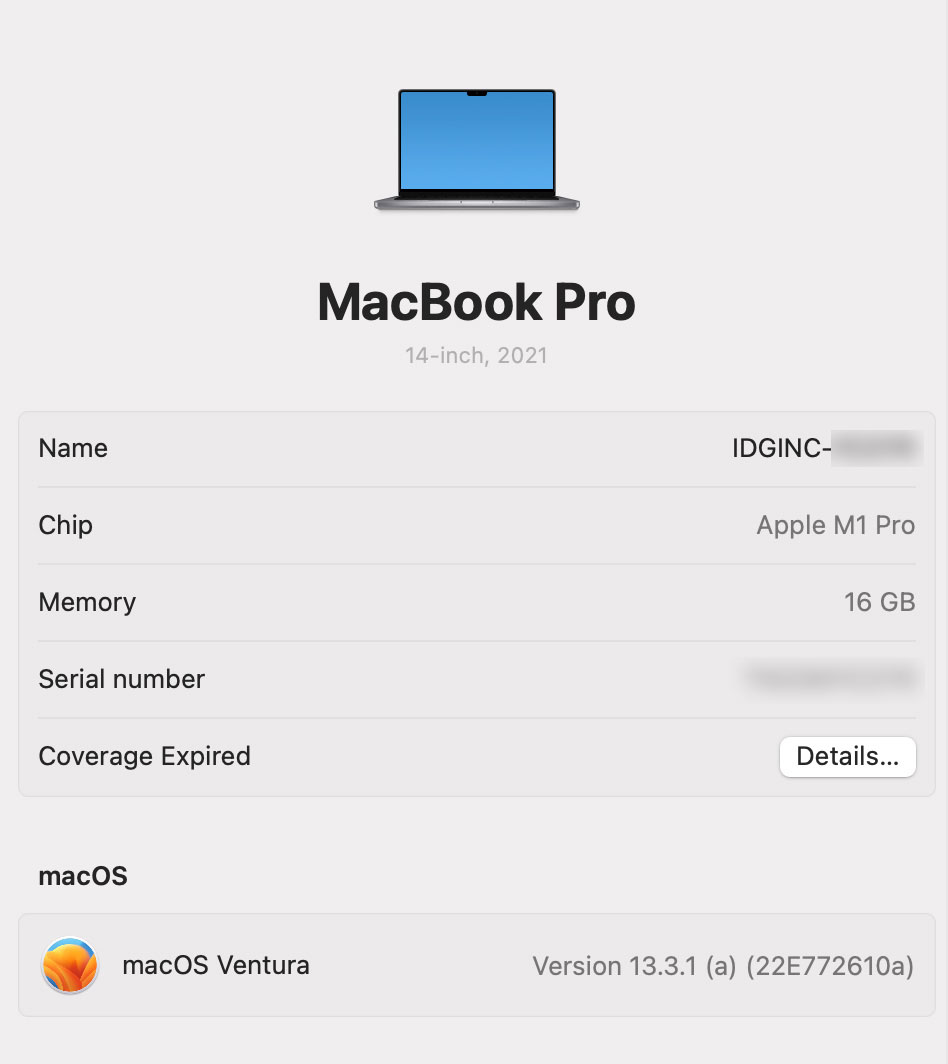
Incidentally, when testing this out I (and a few of my colleagues at various times) hit a snag which I am as yet unable to explain. The first time I reached the “About” page, the macOS version didn’t initially have the Info box next to it. I even took a screenshot as evidence:
 https://b2c-contenthub.com/wp-content/uploads/2023/08/Rapid-Security-Response-Mac-Info-box-not-appearing.jpg?resize=267%2C300&quality=50&strip=all 267w, https://b2c-contenthub.com/wp-content/uploads/2023/08/Rapid-Security-Response-Mac-Info-box-not-appearing.jpg?resize=768%2C862&quality=50&strip=all 768w" width="948" height="1064" sizes="(max-width: 948px) 100vw, 948px" />
Foundry
Yet a few minutes later the Info box had miraculously appeared. I’m not sure what triggered this, but there shouldn’t be any extra steps other than refreshing a few times.
If you encounter the same issue, you could try clicking the macOS version number, which I did a few times and may have helped, or simply wait a few minutes and try again. Or try accessing the About page via the route you didn’t take previously. (If you went via the Apple menu, go via System Settings, and vice versa.) Drop me an email if you hit the same snag and particularly if you can work out what caused it, or a reliable fix.
And how do I decide whether my device receives future Rapid Security Response updates?
We’d recommend that you install Rapid Security Response updates because as we previously mentioned, they are designed to fix serious vulnerabilities, and by default your device will install them automatically. (You may be prompted to restart for this reason.) But you can change this in settings.
On iPhone or iPad, open the Settings app and go to General > Software Update > Automatic Updates. Toggle the Security Responses & System Files setting off (or on).
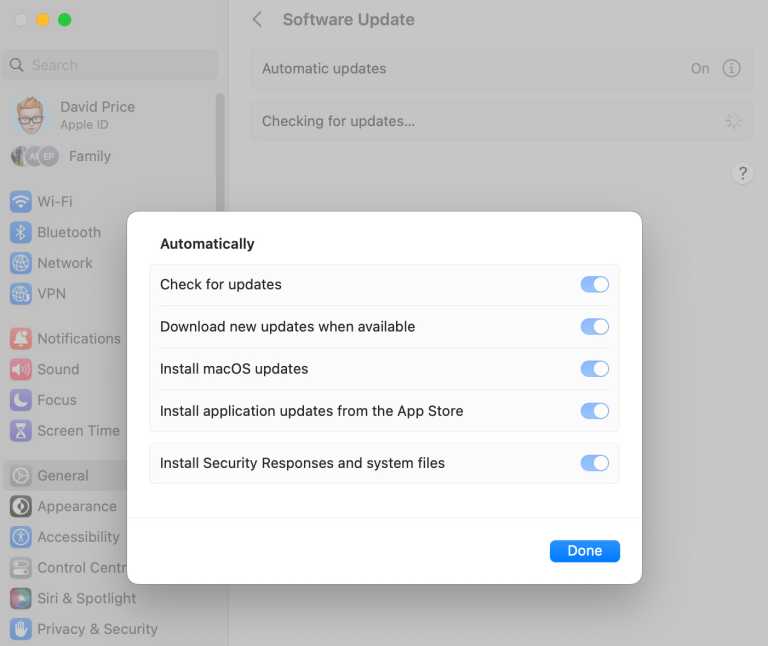
On Mac, open System Settings, and go to General > Software Update. Next to Automatic Updates, you’ll see a button labeled Show Detail, or another lowercase “i” info button. Click it and toggle Install Security Responses and system files setting off (or on).
 https://b2c-contenthub.com/wp-content/uploads/2023/08/How-to-toggle-Rapid-Security-Response-System-Settings.jpg?resize=300%2C252&quality=50&strip=all 300w, https://b2c-contenthub.com/wp-content/uploads/2023/08/How-to-toggle-Rapid-Security-Response-System-Settings.jpg?resize=768%2C646&quality=50&strip=all 768w, https://b2c-contenthub.com/wp-content/uploads/2023/08/How-to-toggle-Rapid-Security-Response-System-Settings.jpg?resize=1200%2C1010&quality=50&strip=all 1200w" width="1200" height="1010" sizes="(max-width: 1200px) 100vw, 1200px" />
Foundry


